Weekly Hands-on How-To powered by KnowHow
How to Extract Water From Carpet and Hard Surfaces
This Week’s Hands-On Segment Focuses on Extracting Water from Carpet and Hard Surfaces
Water damage doesn’t end once the floodwaters recede. It leaves challenges that, if not quickly addressed, can lead to more severe issues like mold growth and structural damage. That's where effective water extraction steps come in, representing a critical phase in the restoration process. This guide, part of our weekly series powered by KnowHow, explores the methods required to extract water from both hard surfaces and carpets efficiently.
Whether you’re facing your first major water mitigation job or you’re a seasoned expert refining your technique, this article provides step-by-step instructions to enhance your skills. We cover everything from initial assessment to the final touches of drying, ensuring that you can tackle any water extraction task with confidence.
So, grab your moisture meters, and let’s dive into the world of water extraction.
Note: This Weekly Hands-On How-To was based on this template in KnowHow’s template library.
Step 1: Assess the Affected Area
Start by walking through the area. Use a moisture meter to check every room, corner, nook, and cranny of the home to map out all affected areas. Understanding where the water has traveled not only aids in effective extraction but also helps anticipate potential issues like mold growth and structural damage.
Step 2: Deal with Contents in the Affected Area
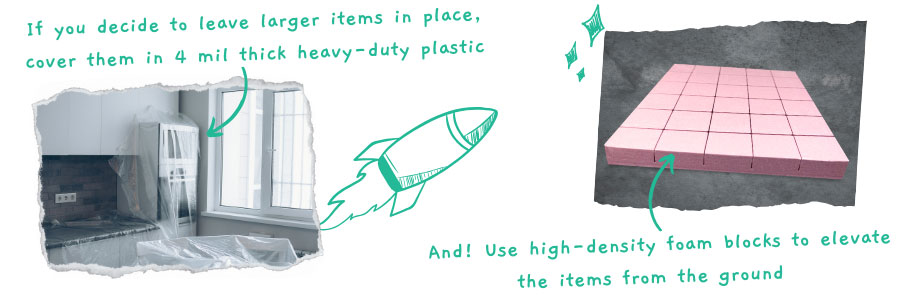
Evaluate each item within the affected zone—furniture, rugs, electronics, and others—and decide whether to move them to a secure location or, if they are too large, to protect them in place. If you have deemed an item too large to move immediately, use the following techniques:
- Elevate furniture on foam blocks to avoid moisture transfer.
- Cover sensitive items with heavy-duty plastic (4 mil thick) sheeting to shield them from water.
Step 3: Ensure All Required Tools are Available
Water extraction requires specific tools tailored to the task at hand. Having all equipment on hand before starting will help ensure a timely and effective extraction process.
Required Tools:
- Moisture meter for ongoing assessments.
- Extraction units, either portable or truck-mounted, depending on the job’s scale.
- Weighted extractors to enhance water removal from carpet fibers.
- Squeegees and floor mats to protect and aid in drying wood floors.
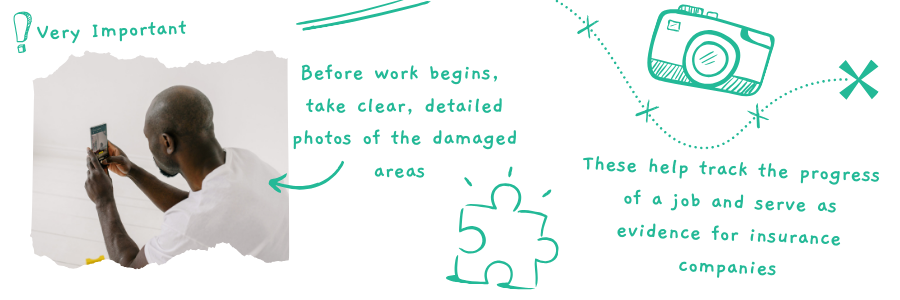
Step 4: Take Photos of Any Pre-Existing Damages
Document the area’s condition before any physical work begins. Taking clear, detailed photos of any pre-existing damage is essential. These images serve as evidence for insurance claims and to distinguish between old and new damage throughout the restoration process.
Looking for quick answers on restoration, remediation and cleaning topics?
Try Ask R&R, our new smart AI search tool.
Ask R&R →
Step 5: Extract Water on Hard Surface Areas
For hardwood floors, specialized floor panels connected to extraction hoses will carefully remove water and minimize damage to the wood. On harder surfaces like painted concrete or epoxy floors, use a squeegee to guide the water to a central point and then a metal wand with a protective cover for extraction.
Step 6: Determine Heavy or Standard Extraction for Carpets
The choice between heavy and standard extraction depends on the water saturation level:
- Heavy extraction - when carpets are thoroughly soaked. This method pulls out a significant amount of water, making any subsequent removal of the carpet pad easier.
- Standard extraction - used for less saturated carpets, removing enough moisture to expedite drying without being overly aggressive and damaging the carpet.
Step 7: If Necessary, Remove Carpet Pad
In cases where heavy extraction is required and the carpet pad has absorbed a lot of water, it may be necessary to remove and replace it. Carefully bag the soaked padding in heavy-duty garbage bags. Do not overfill the bags, as wet carpet is heavy and can cause tears. Secure the bags tightly to prevent any leaks.
Step 8: Re-extract After Pad Removal
After the pad is removed, a secondary extraction on the carpet helps remove any residual moisture. This step is crucial to ensure the subfloor and carpet are as dry as possible before moving forward with structural drying.
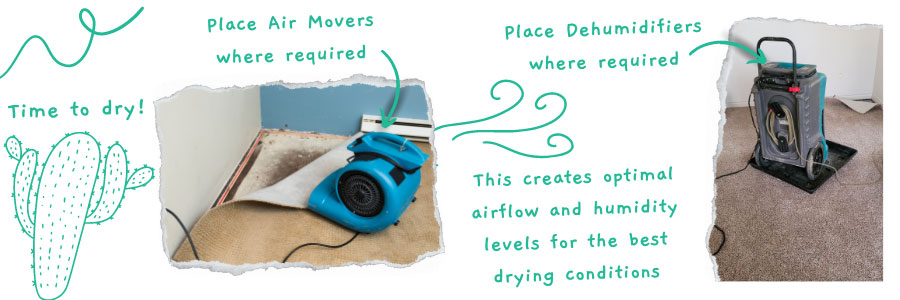
Step 9: Add Drying Equipment
The final critical step, after water extraction is completed, is to set up the right drying equipment. Strategically place air movers and dehumidifiers throughout the affected area to create optimal airflow and humidity levels. Regular monitoring and adjustment of this equipment are necessary to achieve the best drying conditions.
Streamline Your Team's Expertise with KnowHow
Following these detailed steps ensures that water extraction is performed efficiently and effectively and sets the stage for a successful water extraction project. Using KnowHow’s Industry Standard Restoration Templates guarantees that every phase of the process is handled with professionalism and precision.
Beyond KnowHow’s industry standard templates, the tools and resources they provide are essential for onboarding new team members, upskilling current staff, and providing instant on-the-job guidance to restorers in the field.
Ensure your teams are well-equipped to tackle any challenge with confidence and expertise. Head to tryknowhow.com to learn more.
Looking for a reprint of this article?
From high-res PDFs to custom plaques, order your copy today!


