Weekly Hands-on How-To powered by KnowHow
How to Remove Baseboard and Trim
This Week’s Hands-On Segment Focuses on Removing Baseboard and Trim
The term "demolition" often conjures images of chaos and destruction, but when restoring a client's home, the approach needs to be precise and thoughtful. This is especially true for delicate tasks like removing baseboards and trim, where accuracy is essential to avoid costly errors—like accidentally punching holes in the walls, leading to extensive plaster repairs, unneeded reconstruction, or even structural weakening.
Since these setbacks will significantly inflate the project's budget and extend its timeline, it’s critical that your team is well-versed and receives proper guidance to employ the correct techniques for safely and efficiently removing moldings.
So, let’s start tearing down the barriers to success (safely!) and learn the best ways to remove baseboards and trim from a water-damaged home.
Note: This Weekly Hands-On How-To was based on this template in KnowHow’s template library.
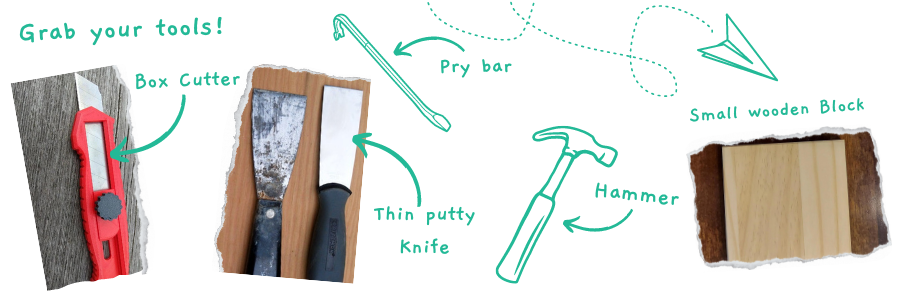
Step 1: Prepare the Required Tools
Before starting, ensure you have all the right tools gathered. Having the right tools for the job will save time and help remove baseboards and trim efficiently without damaging anything.
Essential Tools:
- Razor Blade Knife: For precise cuts through caulk or paint.
- Thin Putty Knife: Slides easily behind trims to gently loosen them.
- Hammer: Useful for nudging the pry bar and putty knife when extra force is needed.
- Pry Bar: Ideal for leveraging and pulling away baseboards smoothly.
- Wood Block: Protects the wall by distributing the force when prying off the trim.
With these tools at hand, you’ll be set to tackle the removal with ease.
Step 2: Start at an Outside Corner
Begin the removal process at an outside corner of the wall. This starting point is generally more accessible and provides better access to the seams at these corners, which are often less tightly bound than those at inside corners. This allows for easier insertion of your tools to pry open the joint.
Step 3: Score the Caulk
Scoring the caulk is a delicate but necessary step to ensure the trim or baseboard can be removed without harming the adjoining wall surfaces. Use a sharp razor knife to methodically score along the top of the trim, focusing on depth and precision to avoid any wall damage.
Looking for quick answers on restoration, remediation and cleaning topics?
Try Ask R&R, our new smart AI search tool.
Ask R&R →
Scoring Tips:
- Take your time to ensure the base is completely separated from the wall.
- Proceed carefully to prevent the knife from slipping and marking the wall.

Step 4: Remove Quarter Round/Shoe Molding
Quarter round or shoe molding is typically installed at the base of baseboards and must be removed before the main baseboard. This step requires careful handling to avoid breaking the thin molding.
Removal Steps:
- Slide a thin putty knife behind the molding and gently tap with a hammer to loosen it.
- Employ a pry bar, placing a wood block against the wall for leverage to pry the molding away without causing damage.
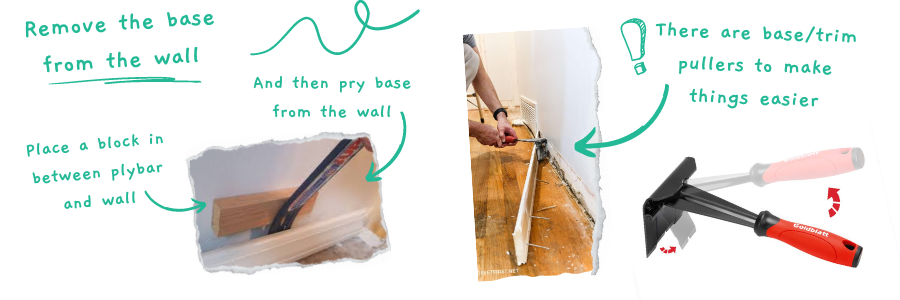
Step 5: Remove the Base
Removing the base requires attention to ensure that it is fully detached from the wall without damaging either the baseboard or the wall. This step often reveals whether the base can indeed be salvaged.
Base Removal Instructions:
- Double-check the scoring to make sure the base is completely separated from the wall.
- Use the pry bar with a wood block to gently separate the base from the wall, tapping carefully with a hammer.
Step 6: Label Each Board if Being Salvaged
If the baseboards are being salvaged, labeling each piece as it is removed is critical for reinstallation. This organization helps ensure that the boards are returned to their original position without confusion.
Labeling Process:
- Write the room abbreviation and a sequential number on the back of each board (e.g., R1, R2, R3 for Rec Room).
- Label the corresponding section of the wall where each piece was removed.
Step 7: Remove Nails from Board and Wall
Once the baseboards are removed, extract any nails from both the boards and the walls. This is important to prepare them for reuse and to ensure safety during handling.
Step 8: Store Baseboard if Being Salvaged
Proper storage of the baseboard is essential to prevent damage and maintain their condition until they are needed again. Organize and store each piece carefully.
Storage Tips:
- Bundle and label the baseboards by room.
- Store in a safe, dry area to prevent warping or other damage.
Nailing the Finish with Precision and Care
In this article, we've walked through each step of removing baseboards and trim with the aim of boosting your team’s confidence and performance on the job. But truly mastering these steps takes more than just a quick read. It comes down to practice and having these instructions at hand when you need them. So, don't forget to save this template!
Dealing with the complexities of water damage restoration can be daunting, especially for new technicians who often need to lean heavily on seasoned team members for guidance during jobs. This is why industry leaders are embracing KnowHow. With our platform, your team gains effortless access to essential, on-the-job guidance in their preferred language, no matter where they are.
Empower your workers with KnowHow, and ensure that every step they take is a step toward success. Discover how we can help at tryknowhow.com.
Looking for a reprint of this article?
From high-res PDFs to custom plaques, order your copy today!


