Weekly Hands-on How-To powered by KnowHow
How to Monitor Drying on a Water Loss Site

Breathing life back into spaces that are seemingly destroyed by water damage is a daunting task for water techs. Whether you're a seasoned veteran or just getting your boots wet in the world of water damage restoration, the challenges remain the same.
Oftentimes, when facing a water loss, countless items and areas of a home are affected. Because of this, it can be difficult to keep track of fluctuating moisture levels, decide when equipment adjustments are needed, or determine when to remove items to prevent further damage.
This step-by-step guide, powered by KnowHow, offers a structured approach to understanding the complexities of structural drying techniques, ensuring you can effectively manage moisture levels, make timely decisions on equipment and item management, and apply the most effective drying techniques needed to excel in water damage restoration.
So, let’s dive into the steps that will enable you to salvage materials that might otherwise face costly demolition or reconstruction.
Note: This Weekly Hands-On How-To was based on this template in KnowHow’s template library.
Step 1: Understand the Monitoring Timeline
Monitoring involves overseeing the job site after the initial demolition/water extraction to ensure the proper operation of drying equipment while overseeing the start of the drying process.
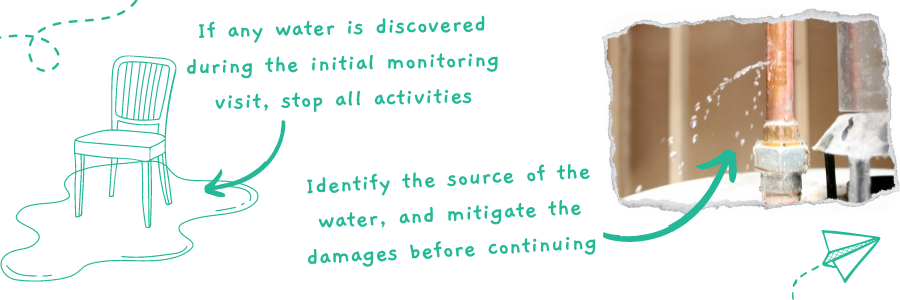
If standing water is discovered during the initial monitoring visit, stop all activities. Identify and rectify the source of the water loss to prevent further damage. After addressing the source, promptly extract any standing water, as the effectiveness of drying equipment depends on the removal of excess water.
Key actions include:
- Monitor and Oversee: Inspect the job site regularly to ensure drying equipment is operational and the drying process is on track.
- Identify and Address Standing Water: Immediately stop all work if standing water is found, identify the source, and rectify it to prevent further damage.
Step 2: Understand the Types of Drying for Water Damage Restoration
There are two primary drying methods for water damage restoration. Understanding these techniques aids in monitoring drying progress, as each method has varying drying times and impacts on the water damage restoration process:
Looking for quick answers on restoration, remediation and cleaning topics?
Try Ask R&R, our new smart AI search tool.
Ask R&R →
1. Disruptive Drying
This method involves removing wet items from the scene or occasionally altering the resting surface of an item or material to accelerate drying. It's used when concerns such as contamination, damage, or cost necessitate removing materials
2. Aggressive or "In-Place" Drying
With this approach, wet items remain in the structure, and warm, dry airflow is used to dry them. It's chosen when contamination and damage are not significant concerns and drying in place is cost-effective.
Step 3: Take Daily Moisture Readings
Spontaneously checking air moisture readings alone is not enough to confirm effective drying during the water damage restoration process. Instead, record the daily moisture content of wet structural materials and moisture levels of the air in your drying log.
Additionally, each day of monitoring, reassess psychrometric conditions to verify adequate dehumidification, using the psychrometric chart to select equipment optimally based on external conditions and humidity.
Key actions include:
- Log moisture daily
- Check the dehumidification process daily
- Choose equipment/strategy using the psychrometric charts
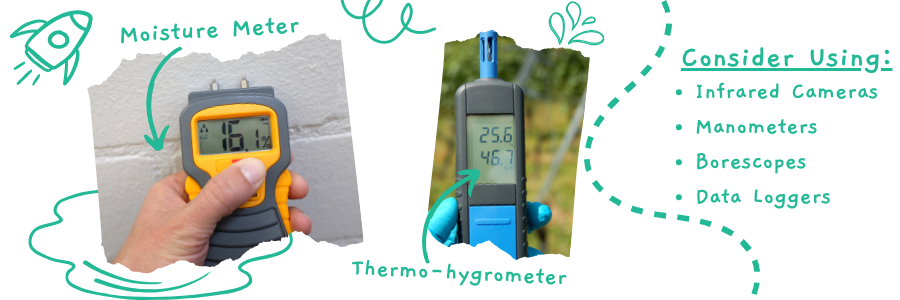
Step 4: Understanding Monitoring Tools and Equipment
You will rely on a variety of tools to measure, monitor, and assess structures during the drying process. Here’s what you need in your toolkit.
Key instruments include:
- Moisture Sensor: Detects moisture in materials over 17% MC, aiding in damage assessment.
- Thermo-Hygrometer: Determines temperature and humidity, which is crucial for establishing drying systems.
- Moisture Meters: Assess moisture content and progress, indicating when materials are dry.
- Miscellaneous Tools: Infrared cameras, thermometers, and data loggers provide comprehensive monitoring.
Step 5: Utilize Air Movement
Rapid air movement across the wet surfaces of materials is vital for effectively and efficiently drying them.
However, it's important to note that surface drying conditions differ from the conditions needed to remove excess moisture within materials. As moisture content decreases, the significance of rapid air movement diminishes relative to vapor pressure.
Step 6: Manage Humidity, Temperature, and Airflow
Humidity, temperature, and airflow are key to controlling moisture movement and evaporation, essential for efficient drying and minimizing microbial growth risk. Keeping surface moisture below 0.75 water activity prevents microbes, even with higher core moisture.
Effective drying involves fine-tuning airflow and energy transfer as conditions change. While their overall importance persists, the need for precise adjustments decreases as progress is made.
The key is to harmonize humidity, temperature, and airflow to achieve efficient drying and maintain balance.
Key actions include:
- Control Humidity, Temperature, and Airflow
- Maintain Surface Moisture Below 0.75 Water Activity
- Fine-Tune Airflow and Energy Transfer
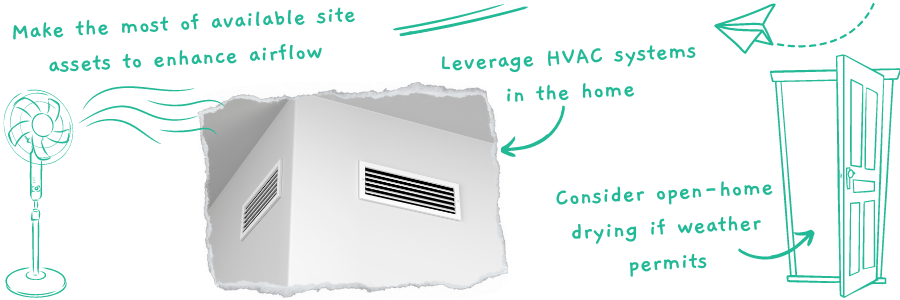
Step 7: Utilize On-Site Assets
Making the most of on-site assets can significantly boost the airflow and facilitate the drying process in water-damaged areas. By strategically utilizing ceiling fans, whole-house fans, exhaust vents, and HVAC systems, we can enhance air circulation, which is crucial for efficient drying.
Key on-site assets:
- Ceiling fans
- Whole-house fans
- Exhaust vents
- HVAC systems
- When conditions permit, consider open-home drying as an additional strategy.
Step 8: Document and Communicate with the Insured
Nearing the end of our water damage restoration, detailed documentation and open communication with the insured become paramount. This essential final step, if overlooked, risks undermining the trust and transparency we've worked hard to establish.
Key activities include:
- Document with Precision: All readings should be time-stamped and thoroughly documented. This not only provides a clear record of progress but also establishes accountability.
- Coordinate and Communicate: Establishing a clear schedule with the insured for upcoming activities demonstrates a commitment to collaboration and keeps them informed.
Mastering the Water Damage Restoration Process with KnowHow
As restorers, you’re intimately familiar with the challenges posed by the damage encountered during the water damage restoration process. But when it comes to tasks like monitoring initial water loss or implementing more advanced techniques, everybody needs a refresher at some point.
So, let's apply these insights and breathe new life into spaces affected by water damage. Because you’re not just restoring buildings; you’re providing peace of mind to those impacted by water damage, and that starts with your team’s knowledge.
To learn more about KnowHow's comprehensive suite of resources and guidance, visit us at tryknowhow.com.
Looking for a reprint of this article?
From high-res PDFs to custom plaques, order your copy today!


