Weekly Hands-on How-To powered by KnowHow
How To Correctly Store Contents in Vaults

Image courtesy of KnowHow
The art of content storage is like a game of chess; every move counts and the safety and position of each piece are paramount. In the realm of content management, particularly after a property loss, how you store, protect, and manage them can significantly influence not only their preservation but also the efficiency of your content team operations.
Last week in our weekly hands-on how-to series, powered by KnowHow, we navigated the complexities and nuances of conducting on-site packouts. This week, we're turning the spotlight from the field to the facility to help navigate you through the steps of storing contents post-packout.
This guide will walk you through creating a storage system that not only safeguards the items but also streamlines operations, ensuring that every piece is accounted for and easily manageable.
Access hundreds of industry-standard templates with KnowHow
Equip your workforce with confidence at tryknowhow.com.
Step 1: Organize Boxes on Pallets for Storage
When storing boxes, it's essential to place them on pallets. This practice not only maintains organization within the warehouse but also facilitates easy movement and transport. Storing boxes on pallets optimizes warehouse space and protects the contents from potential damage. Carefully arrange each box on the pallet, ensuring stability and security. This careful placement prevents accidents or falls, safeguarding both the contents and the staff handling them.
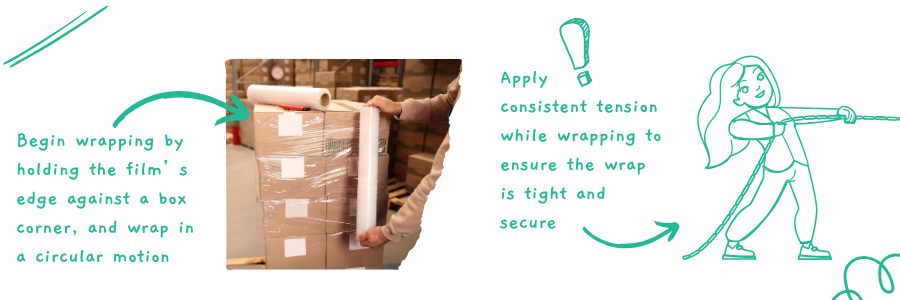
Step 2: Secure Boxes with Stretch-Wrap for Stable Storage
Stretch-wrapping boxes together is crucial for securely storing contents in vaults. This technique helps to stabilize the boxes, preventing them from shifting or falling and maintaining the vault's overall stability.
Start by selecting a high-quality stretch-wrap film and dispenser, ensuring the film's strength is sufficient for the boxes' weight. Place the first box on the pallet or in the vault, aligning it correctly. Begin wrapping by holding the film's end against the box and wrapping in a circular motion, overlapping each layer for a strong bond. Apply consistent tension while wrapping to ensure the wrap is tight and secure. Be mindful of the load's balance throughout the process, distributing weight evenly to avoid imbalances or potential damage.
After wrapping, tear or cut the film and secure the end by tucking it under a wrapped layer, preventing unraveling. By stretch wrapping the boxes, you effectively minimize the risks associated with storage, such as shifting or damage.
Looking for quick answers on restoration, remediation and cleaning topics?
Try Ask R&R, our new smart AI search tool.
Ask R&R →
Step 3: Ensure all Contents are dry and Mold-Free
Before placing any items into a vault, conduct a thorough inspection to check for moisture or mold. It's crucial to ensure that all items are completely dry and free of mold before storage. If you encounter any items that are wet or show signs of mold, do not pack them into the vault. Storing such items can lead to potential damage or contamination of other contents. This precautionary step is essential to maintain the integrity and safety of all items within the vault.
Step 4: Strategically Place Tagged Items into Vaults
For efficient storage, place all tagged items into the vaults, excluding appliances, large mattresses, electronics, big glass pieces, artwork, and oversized sofas or furniture that won't fit. Focus on organizing these items to make the most of the available space in the vaults.
Carefully position each item to ensure security and prevent damage or loss. Smaller tagged items should be prioritized for easy access and identification. Handle all items with care to avoid scratches or breakages.
Step 5: Place Heavy Items into the Proper Vaults
For optimal storage and safety, place all heavy items on the floor of the storage vault. This step involves positioning large, heavy items securely at the bottom of the vault. By doing so, you ensure stability, reducing the risk of items toppling over during storage. This approach also aids in maintaining the vault's overall balance and organization by evenly distributing weight.
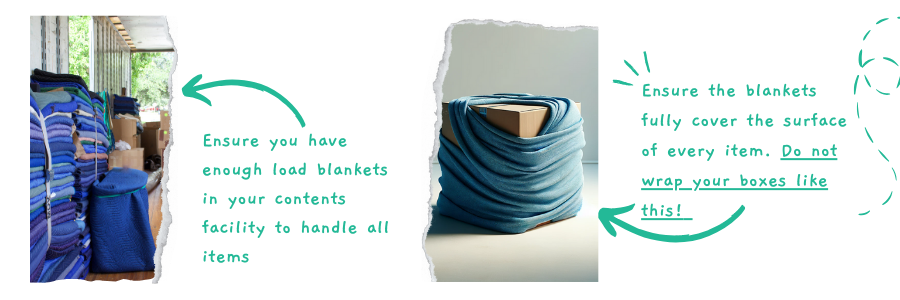
Step 6: Safeguard Items with Load Blankets
To protect items during storage and handling, wrap each one in load blankets. This precaution is vital to prevent potential damage, such as scratches or breakage. Ensure that the load blankets fully cover every item's surface, leaving no part exposed. The cushioning effect of these blankets plays a key role in maintaining the items' integrity and ensuring they remain unharmed while stored in the vaults.
Step 7: Strategize for Efficient Stacking in Vaults
For effective space utilization and stability in storage vaults, adopt a stacking strategy that places smaller items atop heavier ones. Pack the items tightly yet securely, being mindful not to overcrowd the space. The fragility and weight of each item should guide their placement within the vault.
This method not only maximizes available space but also ensures a balanced and secure arrangement within the vault. Such a stacking order is key to preventing the shifting or toppling of items, significantly reducing the risk of damage or physical accidents caused by lifting heavy objects. Exercise caution while stacking, handling each item with care to protect both the items and yourself from potential harm.
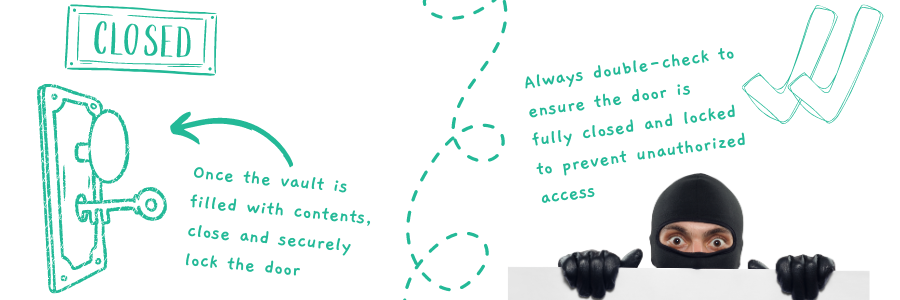
Step 8: Secure the Vault after Filling
Once the vault is filled with contents, it's imperative to close and securely lock the door. This action is crucial for maintaining the safety and security of the stored items. Closing and locking the door effectively prevents unauthorized access and significantly reduces the risk of theft or damage. Always double-check to ensure that the door is fully closed and the lock is securely fastened, providing maximum protection for the contents inside.
Step 9: Label Each Vault for Easy Identification
To streamline the management and retrieval of stored items, affix a sheet on the outside of the vault that clearly displays the identification numbers of the items inside. This labeling system enables easy identification of the vault's contents without the necessity of opening it. Such visible and accessible information is key to efficiently managing the stored items, allowing for quick and precise retrieval whenever needed.
Step 10: Establish a Dedicated Vault for all Specialty Items
Create a separate vault specifically for specialty items to ensure their appropriate organization and protection.
This includes items like:
- Artwork
- Large pieces of glass
- Electronics
- Other expensive items (for which added security with a hasp and lock is advisable).
When setting up this specialized vault, consider the unique requirements of these items, such as the need for temperature control or enhanced security measures. Clearly label the vault to identify its specialized contents easily. Keeping this vault separate from general storage areas is crucial to avoid any potential damage or mix-up with non-specialty items.
Step 12: Ensure Continuous Security Surveillance
It's imperative to have security cameras installed and operational around the storage areas at all times. This measure is not just about deterring theft or unauthorized access; it's about providing constant surveillance and monitoring of the items within the vaults. Continuous camera surveillance is a crucial step in safeguarding the stored contents, ensuring peace of mind, and enhancing the security of the storage facility.

Note: This Weekly Hands-On How-To was based on this template in KnowHow’s template library.
Effective management of a content storage facility is not just about organization and attention to detail—it's also about leveraging the right tools and resources to harness the collective experience of your team. At KnowHow, we understand that teams in the restoration industry come from varied backgrounds, especially when faced with the specialized task of storing contents after a property loss.
The steps outlined in this guide offer your team a clear, actionable roadmap for content storage, yet our mission extends far beyond that. At KnowHow, we're dedicated to equipping every restorer with the essential tools for every aspect of their job. From detailed in-the-field guidance to navigating administrative tasks like filing expense reports, our suite of tools is tailored to align with your business's specific processes and SOPs, ensuring your team is supported every step of the way.
To explore how KnowHow can elevate your team's capabilities and confidence, visit us at tryknowhow.com.
Looking for a reprint of this article?
From high-res PDFs to custom plaques, order your copy today!


