Weekly Hands-on How-To powered by KnowHow
How to Dry a Home Damaged by Frozen Pipes: A Step-by-Step Guide for Restorers
Winter brings more than just a drop in the thermometer; it introduces unique challenges to homes and businesses, particularly when it comes to frozen water pipes. In these situations, the depth of a team's knowledge can make all the difference. This weekly series, powered by KnowHow, is designed to help transfer this knowledge and expertise from the minds of a few subject matter experts in your organization to your entire team.
Today, our series tackles how to dry a home with frozen pipes. Whether it's your first time coming across this challenge or a constant seasonal hurdle, we've got you covered.
This step-by-step process is only one of the hundreds of industry-standard templates that KnowHow provides to customers to enable their teams to work confidently and equip every staff member with the necessary tools, skills, and knowledge they need to succeed in their role.
So, grab your ice picks, and let's start chipping away at the most effective way to dry a home with frozen pipes.
Step 1: Cautiously Approach the Home
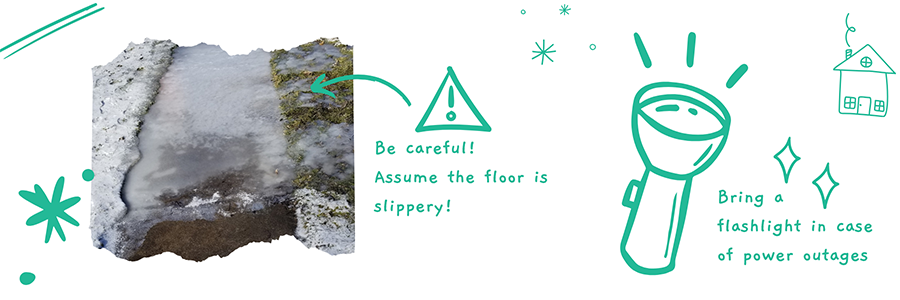
Approach homes with frozen pipes carefully. Ice buildup from leaking water can make driveways slippery, and ice may also form on indoor floors. With likely power outages, always carry a strong flashlight for safety.
Step 2: Establish Temporary Power
For jobs requiring it, establish temporary power and lighting by a licensed electrician. This includes setting up temporary outlets, lighting, and a circuit to run either the original furnace (if undamaged) or a temporary furnace.
Step 3: Document the State of the Home
Ensure thorough photo documentation of the pipe freeze mitigation process from start to finish. Capture detailed photographs of all steps, including the location of frozen pipes, mitigation measures, and subcontractor work by Electricians, Plumbers, and HVAC companies. Upload these photos into the company software for organized and accessible future reference.
Looking for quick answers on restoration, remediation and cleaning topics?
Try Ask R&R, our new smart AI search tool.
Ask R&R →
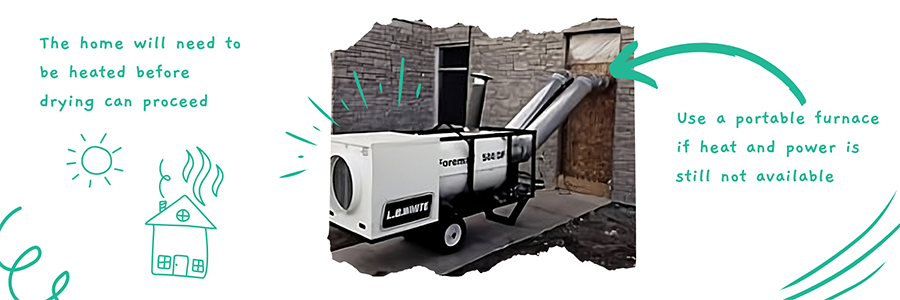
Step 4: Heat Up the Home
If the home lacks heat, start by warming it up before fixing the pipes and drying the home. Have a licensed HVAC company inspect the existing furnace. If it's inoperable, arrange for a temporary/portable furnace installation.
Step 5: Identify and Repair Pipe Breaks
With power and heat established, address the plumbing. A licensed plumber should identify all pipe breaks, fix the obvious ones, and pressurize the water system to test for additional hidden breaks.
Step 6: Perform Mitigation Work
After restoring power, heating the home, and repairing plumbing, begin mitigation work. Refer to the attached links for guides on responding to Category 1, 2, or 3 mitigation projects:
Respond to Initial Call for Mitigation Project Category I
Respond to Initial Call for Mitigation Project Category II
Respond to Initial Call for Mitigation Project Category III
Step 7: Advise Homeowners on Prevention
Educate homeowners on proactive measures to prevent frozen pipes. Share relevant resources, like the following link, to guide them in taking preventative steps before cold weather sets in:
Consumer Reports | How to Keep Pipes from Freezing
Note:
Every restoration team has a unique blend of fresh faces and seasoned experts. Our findings at KnowHow reveal that many new entrants to this field step in without a background in construction. This mix of work backgrounds highlights the need for a resource that not only guides your team but can also act as a mentor.
With KnowHow, onboarding new staff becomes more intuitive, and providing quick, accurate answers in the field becomes routine. We empower your staff to understand not only 'what' needs to be done but also 'how' to do it effectively. It’s about giving every team member, regardless of their experience, the confidence to tackle any task, from intricate procedures like drying frozen pipes to the everyday nuances of the job.
To learn more about KnowHow, visit us at tryknowhow.com.
Looking for a reprint of this article?
From high-res PDFs to custom plaques, order your copy today!


