Weekly Hands-on How-To powered by KnowHow
How To Don and Doff Full PPE
Something often taken for granted by seasoned restorers, yet crucial in their daily operations, is how intricate the knowledge required for correctly donning and doffing Personal Protective Equipment (PPE) is. For many, this process has become second nature, a routine as familiar as the back of their hand. Yet, for those new to the restoration field, navigating the proper use of PPE can seem as daunting as jumping onto the dance floor to learn the salsa for the first time.
So, this week in our hands-on how-to series, powered by KnowHow, we're going to show you the moves. Whether it's the aftermath of a fire, the intricacies of mold remediation, or the challenges posed by flood damage, the correct application and removal of PPE are a paramount first line of defense to ensure occupational safety and compliance with health regulations.
So join us as we explore the essential steps required to master this dance and adequately equip yourself to face the daily hazards of restoration work.
NOTE: This step-by-step how-to is based on this process from KnowHow’s expansive template library, available for all KnowHow users.
Step 1: Conduct Initial Hazard Assessment
Before donning any protective gear, it's crucial to conduct a thorough hazard assessment to ensure the safety of all personnel. This step directly impacts the effectiveness of the chosen PPE.
The hazard assessment takes into account several key factors:
- Source of Loss: Identify the cause of the incident (e.g., fire, flood) to understand the potential hazards present.
- Building Characteristics: Consider the age and type of the building, as different structures may contain varied materials that pose distinct risks.
- Property Type: Determine whether the site is commercial or residential; this can influence the types of hazards likely encountered.
- Utility Status: Check if services (electricity, gas, water) are disconnected to avoid risks such as electrocution or gas leaks.
- Structural Integrity: Assess whether the building is structurally sound to ensure it's safe to enter and work within.
- Hazardous Materials: Identify any hazardous materials present that could impact the type of PPE required.
This comprehensive hazard assessment equips you with the knowledge needed to select the correct PPE and ensure maximum safety in the face of the specific conditions of each restoration site.
Step 2: Prepare Space and Equipment
Once it's determined that full PPE is necessary, organize all equipment in a designated area for easy access and logical dressing order, laying each piece out neatly.
Looking for quick answers on restoration, remediation and cleaning topics?
Try Ask R&R, our new smart AI search tool.
Ask R&R →
Additionally, prepare adhesive strips for securing PPE at wrists and ankles:
- Prepare four strips of tape of sufficient length to wrap around wrists and ankles snugly, preventing exposure or slippage.
- Fold the ends of each strip to create non-sticky handles for easy adjustment and removal, even with gloves on. This prevents accidental tearing of gloves by avoiding direct contact with the adhesive.
Step 3: Pull on Coveralls and Footwear
Selecting and donning coveralls and footwear correctly is paramount for ensuring maximum protection and mobility. The right fit of coveralls is crucial; too small, and they risk tearing, compromising your safety against hazardous materials. Too large, and the excess fabric could catch and tear on protruding edges.
Donning Coveralls:
- Preparation: Carefully remove coveralls from storage and unfold them for dressing.
- Entry: Fully unzip the suit, hold it by the waist, and gently shake it to separate the legs.
- Legs First: Step into the coveralls, pulling them up cautiously to avoid tears, especially over shoes or boots.
- Upper Body: Pull the coveralls over your torso and slide your arms into the sleeves once the legs are secure.
- Securing: Zip the coveralls halfway to allow flexibility when putting on boots or footwear.
Donning Footwear:
- Stability: Sit or lean against a stable surface to prevent imbalance while putting on boots and avoiding falls.
- Final Adjustments: After putting on boots, carefully pull the coverall legs down over the tops of your boot
- Sealing: Use the pre-prepared tape strips to securely tape the cuff of the coverall ankles to your boots, creating a sealed barrier against hazardous materials.
Step 4: Put On Additional Equipment
In this step, you'll layer on additional safety equipment.
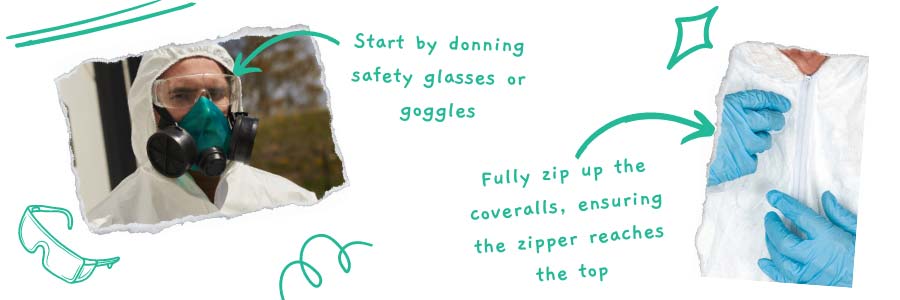
- Safety Glasses or Goggles: Start by donning safety glasses or goggles to shield your eyes from dust, debris, or chemical splashes.
- Coverall Hood: Pull the hood of the coveralls over your head, ensuring all hair is tucked inside to maintain the protective barrier's integrity. The hood should fit snugly around your face, leaving no skin exposed and creating a continuous shield with the rest of your coverall.
- Zip Up Coveralls: Fully zip up the coveralls, ensuring the zipper reaches the top and is secured at the collar.
- Hard Hat: Place a hard hat over the coverall hood to protect against impact, puncture, and electrical hazards. Ensure it fits securely on your head and fasten the chin strap.
This process ensures comprehensive protection by layering on essential safety gear, forming a defense against the workplace hazards you're preparing to face.
Step 5: Don Your Respirator
The respirator is a crucial component of your PPE, designed to safeguard your respiratory system from harmful contaminants. Properly fitting and wearing your respirator is essential for it to be effective.
 Note: Facial hair can compromise the respirator's seal. For a proper seal, it's recommended to have a clean-shaven face in areas where the respirator makes contact with the skin.
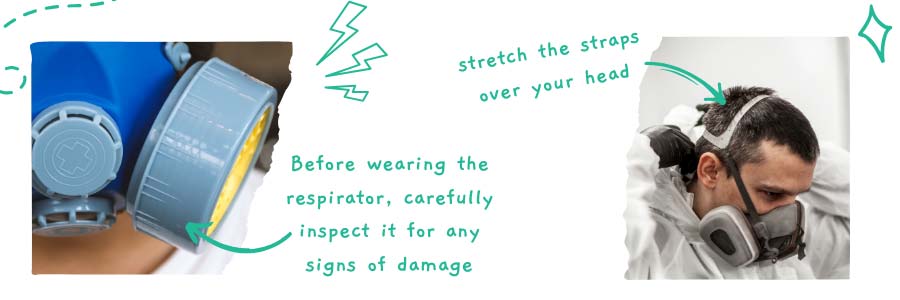
- Inspection: Before wearing the respirator, carefully inspect it for any signs of damage. Check the seal, straps, and cartridge filters to ensure they're in good condition.
- Cartridge Filters: Confirm that the correct cartridge filters for your task are securely attached to the respirator.
- Positioning: Hold the respirator with one hand, positioning it to cover your nose and mouth. Avoid touching the filter cartridges directly to prevent contaminating them.
- Secure Straps: With your other hand, stretch the straps over your head and adjust them to the back of your head. Position the lower straps under your ears and around the base of your neck, then adjust the upper straps higher up on the back of your head. Ensure the straps lie flat and smooth against your head without twists or overlaps. A snug, comfortable fit is crucial for an effective seal.
Step 6: Put on Gloves
It's time to shield your hands from potential hazards. The need for double gloving depends on the mitigation task's nature.
Slip on your gloves snugly, ensuring a secure fit, and consider layering a second pair if the task warrants. Then, pull the gloves over the cuffs of your coveralls to prevent any entry of hazardous materials. Seal the interface between the gloves and coveralls with tape, pressing firmly to ensure a tight seal. Precision in donning your gloves is key to protecting yourself in these hazardous conditions.
Step 7: Prepare to Remove PPE
After completing the work, safely removing PPE is crucial to prevent contaminant spread and ensure the wearer's safety. Start by setting up disposal and cleaning stations:
- Prepare Two Bags: Organize one for items to be disposed of according to your disposal procedures and another for items needing cleaning or decontamination. This ensures hazardous materials are managed correctly.
- Vacuum Coveralls if Needed: Use a filtered vacuum to remove hazardous particles efficiently. Begin at the top of the coveralls and work systematically downwards, ensuring thorough removal of all particulates.
Step 8: Remove PPE Starting at the Top
Start by removing PPE from the top down, ensuring the respirator remains on until coveralls are fully removed. This precaution shields you from any airborne particles stirred during removal.
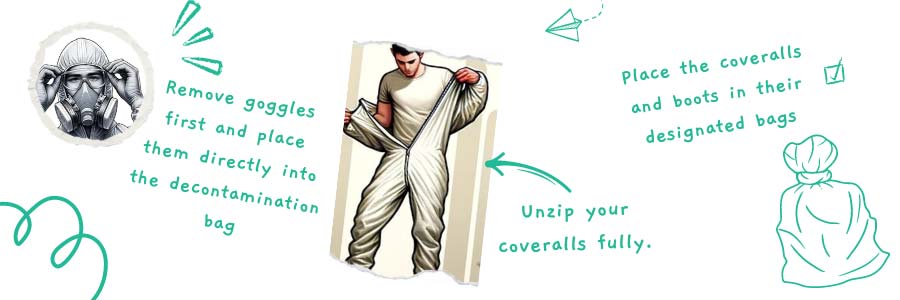
- Hard Hat and Goggles: Remove these first and place them directly into the designated bag for decontamination, avoiding contact with clean surfaces
- Coverall Hood: To avoid contaminating your face, grasp the hood from the back and pull it open and away from your face backward, ensuring no contamination reaches your face.
- Unzip Coveralls: Start by unzipping your coveralls fully.
- Arm Removal: Gently remove one arm, sliding it out while pulling back the cuff and attached glove to invert the sleeve. Repeat with the second arm. If double-gloved, the outer pair will come off with the coveralls. Keep the second pair on.
- Detach from Boots: If your pants are taped to your boots, carefully remove the tape now, using the non-sticky folded edge to avoid tearing your gloves.
- Roll Down Coveralls: Slowly roll the coveralls down over themselves to minimize contact with any contaminants. If pant cuffs are connected to boots, roll the pant leg down over the boot.
- Boots Removal: Step out of your boots, leaving the coveralls and boots connected, then lift the coverall off the boots.
- Disposal and Decontamination: Place the coveralls in a designated disposal bag and the boots in a bag for decontamination.
This systematic approach ensures any potential contaminants on the coveralls, boots, and protective gear are contained and managed properly throughout the removal process, maintaining safety protocols.
Step 9: Close Bags and Remove Gloves
Ensuring bags are correctly sealed and gloves are safely removed is a critical final step in the PPE removal process.
Decontamination Bag:
- Seal the Bag: While still gloved, securely tie the decontamination bag containing items requiring cleaning.
Carefully remove your gloves to avoid contaminant contact with the skin:
- First Glove: Pinch the wrist area of the glove and pull it down over your hand, turning it inside out in the process.
- Second Glove: Holding the inverted first glove in your gloved hand, use the first glove's inside edge to catch the second glove's edge. Pull down, inverting the second glove over the first.
Disposal Bag:
- Place Gloves: Deposit the removed gloves into the disposal bag, ensuring they're contained.
- Tie and Dispose: Securely tie the disposal bag and follow proper protocols for disposing of hazardous waste.
Step 10: Wash Hands
After removing PPE, thoroughly wash or disinfect your hands. Use soap and warm water, scrubbing for at least 20 seconds, paying attention to backs of hands, between fingers, and under nails. If washing isn't possible, use a hand sanitizer with 60% alcohol content.
Step 11: Remove Respirator
Grip the respirator without touching the cartridges to prevent contamination. Pull the straps over your head and lift the respirator away from your face. Tape over the cartridges, and place that respirator in the decontamination bag for cleaning.
Mastering the art of donning and doffing PPE is not just a skill; it's a vital aspect of your everyday work in the field, ensuring your safety as you work to restore normalcy for your clients. This process can seem daunting initially, but with KnowHow by your side, it will become second nature in no time.
KnowHow is more than just a resource; it's a trusted partner in many restorer’s daily operations. With a comprehensive array of training materials, SOPs, and immediate on-the-job support tailored to your company's procedures, KnowHow empowers every team member, regardless of experience level, to approach their tasks with the confidence and competence they need to clock-out feeling like they’ve made an impact.
To explore how KnowHow can enhance your team's capabilities and confidence, visit us at tryknowhow.com.
Looking for a reprint of this article?
From high-res PDFs to custom plaques, order your copy today!


