Weekly Hands-on How-To powered by KnowHow
How To Install Air Movers
This Week’s Hands-On Segment Focuses on Proper Installation of Air Movers
.webp?t=1714903494)
So you've finished extracting the water from a client's home. Now it's time to get as many air movers in there as possible, right? Unfortunately, it's not that simple. The nuances associated with airflow in a home can significantly impact the drying process. Placing air movers randomly throughout the space won’t guarantee a quick dry; instead, it could lead to uneven drying and potentially more damage.
Efficient drying requires a strategic approach to air mover placement, considering factors like the type and extent of water damage, the layout of the home, and the materials affected.
Here are some typical complexities that make strategic placement essential:
- Space Constraints: Limited space can hinder optimal air mover placement and quantity, affecting drying efficiency.
- Power Availability: Limited electrical outlets and capacity may restrict the number of air movers used.
- Material Variability: Different materials absorb and release moisture differently, requiring customized airflow strategies.
- Moisture Redistribution: Improper placement can push moisture into dry areas or trap it, risking secondary damage.
- Interference with Daily Activities: Air mover setup must consider minimizing disruption in occupied spaces.
Whether you’re a beginner getting your feet wet or a seasoned professional, mastering the placement of air movers is crucial for a successful restoration. This step-by-step guide, powered by KnowHow, will navigate you through the science of air mover setup.
So, let’s break down how to assess the area, calculate the necessary number of air movers, and position them to maximize airflow and enhance drying efficiency.
Note: This Weekly Hands-On How-To was based on this template in KnowHow’s template library.
Step 1: Decide How Many Air Movers to Use
Consider the extent of the wet surfaces, the volume of water, and the accessibility of moisture-laden areas like wall cavities and under cabinets. Optimal airflow is achieved when air consistently moves across all damp surfaces.
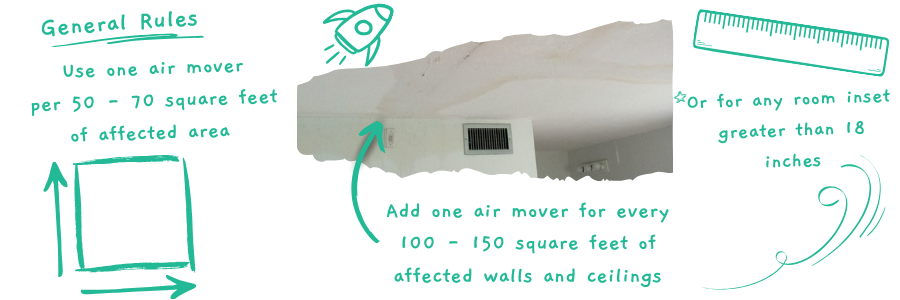
General Rules:
Floor Coverage: Use one air mover per 50-70 sq. ft. of affected floor area, adjusting for the type of flooring.
Looking for quick answers on restoration, remediation and cleaning topics?
Try Ask R&R, our new smart AI search tool.
Ask R&R →
Wall and Ceiling Coverage: Add one air mover for every 100-150 sq. ft. of affected walls and ceilings above 2 feet.
Room Features: Include an air mover for any room offset or inset greater than 18 inches.
Step 2: Understand Exceptions
Certain situations require specific adjustments. If the primary wet areas are the lower sections of walls with limited floor surface affected, the setup changes.
Exception Rule: Place one air mover every 14 linear feet along the perimeter of affected walls, especially if water has not spread more than 2 feet into the room center. This guideline should be used independently of the general tips in Step 1.
Step 3: Place and Adjust Air Movers
First, strategically position the required number of air movers based on material type, saturation, and accessibility, aligning them with available power and adhering to a typical ratio of 4-5 air movers per dehumidifier. After initial setup, monitor and adjust the placement to ensure optimal airflow over all wet areas, including lower walls. As areas dry, remove air movers to focus on remaining wet zones. Document adjustments to support the evolving strategy.
Step 4: Position Air Movers at Optimal Angles
Position air movers at angles ranging from 5 to 45 degrees relative to the wall, depending on the specific drying requirements dictated by the type of wall and moisture level. Proper angles will ensure that the air movers are circulating airflow efficiently.

Step 5: Set the Snout of the Air Mover Correctly
Place the snout of each air mover approximately 1 inch away from the wall to avoid direct contact. Direct contact with the wall can impede air flow and reduce the efficiency of the drying process.
Step 6: Align Air Movers Directionally
Ensure all air movers face the same direction to prevent them from counteracting each other's airflow. This coordination enhances the overall effectiveness of the setup.
Go with the Flow
Mastering the art of air mover placement is imperative for efficient drying and successful restoration. With the complexities associated with airflow in a home, a strategic approach is necessary to ensure uniform drying and prevent further damage. But how can you ensure they are always set up properly? By leveraging KnowHow.
With KnowHow, restorers can tackle any water damage scenario with confidence and competence. KnowHow is quickly becoming the preferred way for industry leaders to onboard, upskill, and provide on-the-job guidance to their workforce. From centralizing SOPs to offering instant support in the field, KnowHow ensures that every member of your team can handle any challenge thrown their way.
Don't let the complexities of water damage restoration overwhelm your team. Visit us at tryknowhow.com today.
Looking for a reprint of this article?
From high-res PDFs to custom plaques, order your copy today!


