How to Detect and Dry Water Trapped Between Ceramic Floor Tile, Thinset and Concrete Slab
Learn how to assess, map and dry ceramic tile flooring using proven restoration techniques

Introduction:
Ceramic floor tiles are made from fired clays and glazed minerals where they are generally impervious to water, and they are designed to be washed without degrading. Unlike porous flooring such as wood and carpet, and semi-porous natural stone such as marble and travertine, ceramic tiles do not absorb water, which prevents swelling, warping and microbial growth inside the tile itself.
Water from a pipe break or other circumstance that causes water to enter the “flooring system” may find a way to get under ceramic floor tiles, such as through porous grout joints, large to micro-fine hairline cracks in tile and grout, and the sides of tiles that are at the perimeter of a room.
Once water has found a way to migrate under ceramic tile, it pools between the concrete slab and the bottom of the tile, filling trowel notches and absorbing into the mortar and thinset.


Credit: Patrick Moffett
Water by itself does not care if it is categorized as Category 1, 2 or 3 water (also known as clean, grey and black water). Once water of any category finds its way under flooring, if it is not removed, it is capable of causing damage to various substrates that make up the ceramic tile flooring system.
The goal of the water damage restoration professional (restorer) is to remove liquid water and elevated moisture in the material as quickly as possible so it does not cause damage to the tile flooring system.
Moisture Assessments and Moisture Mapping:
When the restorer observes standing water, it should be documented and placed on a moisture map describing both the affected and non-affected areas in rooms.
- Sometimes the moisture map diagram remains stable, meaning water did not migrate beyond what was identified on the moisture map.
- In other situations, standing water is only the tip of water migration pattern, because water flowed under floor tiles to adjoining areas, such as under cabinets, tubs, showers, walls and flooring in adjoining rooms.
In documenting the presence and the path of water migrating under ceramic floor tile:
Looking for quick answers on restoration, remediation and cleaning topics?
Try Ask R&R, our new smart AI search tool.
Ask R&R →
- Dry the surface of wet tiles (which may take a day or longer to complete).
- When Category 2 or 3 water is on the surface of tile and grout, detergent wash then clean water rinse before starting the surface drying process.
- Use non-penetrating moisture meters to generate a moisture map of trapped water under floor tiles.
- At a minimum, non-penetrating moisture meters should detect moisture below ceramic floor tile down to ¾-inch (19~20 mm). A Tramex ME5 meter can detect moisture in ceramic tile flooring down to 1.25 inches (30 mm).
- Ball type meter moisture meters like FLIR MR59, Extech MO57 and Triplett MS300 can provide moisture content readings lower than most pad-like non- penetrating moisture meters, such as a depth down to 4-inches (101 mm).
- When practical, use thermal imaging cameras that may provide more detailed information about trapped moisture in tile flooring, walls, under and behind cabinets.
Unlike wood-framed subflooring, where pressure differentials can be created below and above the subfloor, a concrete slab subfloor limits creating pressure differentials. Types of professional drying methods that can create a pressure differential to remove trapped water and moisture include but are not limited to:
Note: In each of these scenarios, depending on the project, grout joints may be left in place or cut out.
- Air movement and use low-grain refrigerant dehumidification over tile flooring.
- Install a floor-mat drying system and use low-grain refrigerant dehumidification over tile flooring.
- Tent ceramic tile flooring, use air movement and low-grain refrigerant or desiccant dehumidification over tile flooring.
- Install a radiant heat mat system over tile flooring and ventilate.
Credit: Patrick Moffett
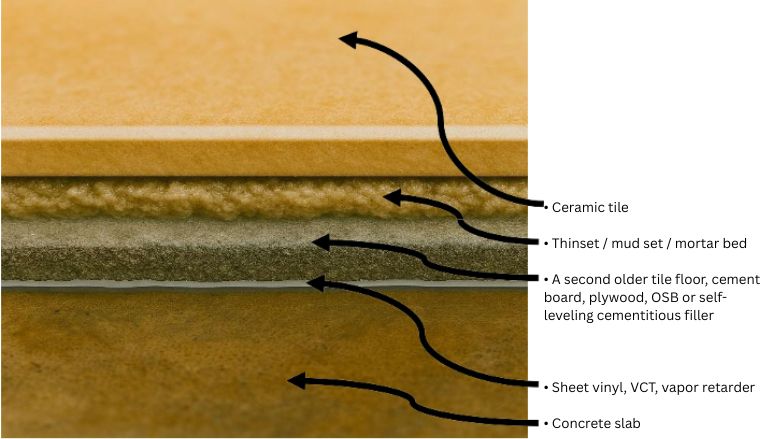
Inspecting Ceramic Tile and the Flooring System:
A ceramic tile floor “flooring system” generally includes the ceramic tile, thinset and the concrete slab.
In other instances, the flooring system may include:
- Ceramic tile
- Thinset / mud set / mortar bed
- A second older tile floor, cement board, plywood, OSB or self-leveling cementitious filler
- Sheet vinyl, VCT, vapor retarder
- Concrete slab
Once the cause and origin of the water is identified and eliminated, inspecting the entire flooring system is important, because inadequate information can result in drying failures. Without damaging the flooring system inspect different subfloor layers. To complete this may require one or more of the following:
- Cut out grout
- Remove wall baseboard
- Remove loose ceramic floor tiles
- Remove toe-kicks from under cabinets
- Remove the reducer to other floor types
- Remove toilet and wax ring in bathroom
- Remove floor register and electrical outlets
- Lift carpet that is installed adjacent to tile flooring
Tile Floor Drying – The Science Behind Creating Pressure Differentials:
Water in wet ceramic tile flooring systems moves according to vapor pressure gradients, capillary action and the material’s permeability. Each material will have its own criteria, where the least permeable material can slow down or stop the drying process of all other materials. Let’s look at the physics:
- Dalton’s Law of Physics and Pressure: Drying is effective when the partial vapor pressure of water in air above the surface is lower than that in the material.
- Fick’s Law of Diffusion: The rate of vapor movement is proportional to the vapor pressure gradient. Larger pressure differentials equals faster drying.
- Bernoulli’s Principles of Suction: Negative air machines (NAMs) or vacuum floor mats reduce air pressure at grout and tile joints, “pulling” moisture vapor out.
Moisture Movement Principles:
- Vapor Pressure Gradients:
- Moisture moves from areas of a higher pressure (wet materials) to areas having a lower vapor pressure (drier air and materials under the ceramic tile).
- By lowering the vapor pressure in the air above the tile floor, moisture will be “pulled” upward from wet thinset and concrete into the drying process.
- Capillary Action:
- Thinset and concrete are cementitious and highly porous materials. Under ceramic tile flooring, water and water vapor spreads through microscopic air spaces, pores and voids into dryer materials or areas.
- Permeability Differences:
- Ceramic tiles are impervious (almost zero vapor transmission), where evaporation must come from around or below the tile.
- Recognizing there is a concrete slab below, that may be partially saturated, the grout joints, microcracks, fissures and tile edges at walls or cabinets are the only “gateways” for water vapor to find a way to move upwards and escape.
Using Pressure Differentials in an Attempt to Dry Ceramic Tile Floor Substrates:
- By applying negative or positive air pressure over the ceramic tile floor, the restorer is essentially forcing moisture vapor in one direction or another:
- Negative air pressure creates suction through grout lines and micro-voids, which pulls (extracts) moisture vapor upward and out of the floor tile.
- Positive pressure forces dryer heated air around ceramic tile flooring and passing downwards into wet substrates where moisture wants to move laterally or upwards to escape. Drier (lower grain air) and heated air creates moisture diffusion, where evaporation of wet substrates occur more rapidly.
- Push/Pull System includes using positive and negative air pressure simultaneously creates a synergistic effect to remove trapped moisture under ceramic tile flooring.
- Negative air pressure (extraction) vacuums and pulls moisture air up and out of grout and other access points. The direction of negative air pressure ensures moisture vapor has somewhere to go instead of stagnating under floor tiles which potentially can cause secondary damage to substrates, coupled with:
- Positive pressure (lower grain heated air) is injected beneath the tile. It raises the vapor pressure inside open air spaces of pores, thinset and concrete by introducing lower relative humidity, where warm air accelerates evaporation.
- By adding positive pressure drier air to the drying process, it allows the negative air to remove moist air more efficiently.
- Negative air pressure (extraction) vacuums and pulls moisture air up and out of grout and other access points. The direction of negative air pressure ensures moisture vapor has somewhere to go instead of stagnating under floor tiles which potentially can cause secondary damage to substrates, coupled with:
Causes and Indications of Tile Floor System Problems:
Floor tile moisture problems may be caused by moisture rising through the concrete slab, poor site drainage, settlement or earth movement, spalling of concrete, not having a vapor retarder when required, installing tiles on uneven flooring, incompatible materials, applying the wrong adhesive (adhesive should be latex or polymer modified thinset), using the wrong notch trowel, multiple layers of older flooring, butting up to incompatible flooring, not allowing for the proper expansion gaps at walls and cabinets, zero or minimal grout joints, unsealed or aged grout, poor installation, installing flooring in too cold or hot weather conditions, lack of interior ventilation in high-humid environments, condensation, musty odors, pest infestation, leaks in plumbing, prior water damages, to water sources that enter the flooring system from sides or at the top of the floor.
In examining several moisture problems:
- Grout is porous where it can be damaged by the continuous contact with water, and stresses placed on it by the movement of the flooring system as substrates dry.
- Thinset mortars generally do not degrade when having contact with water, but when thinset interacts with other substrates that tend to dry at different rates, thermal expansion can cause thinset to release (debond) from the concrete slab, other substrates and the ceramic tile.
- Cracks and lifting (buckling, tenting) can occur from pressures exerted on ceramic tiles from the side and below the tile. This can occur when water becomes trapped under floor tiles, where changes in temperature can trigger a thermal reaction at the tile, thinset, other substrates and the concrete slab. In other words, thermal reactions cause expansion of water molecules, resulting in pressure buildup and the eventual separation of substrates from their bonding agent.
- An indicator of ongoing substrate damage is efflorescence. Water is interacting with alkaline minerals in the flooring system (e.g., concrete, mortar and grout) along with contaminants that entered during flooding. As thermal reaction and pressure develops, chemical changes can occur forcing water vapor to move up at grout joints, leaving behind crystalline deposits of salts. (In natural stone flooring, efflorescence may be seen in the stone.)
- One of the main marker bacteria in sewage is Escherichia coli (E. coli). Outside of a sewer system, E. coli along with sulfate/sulfur reducing bacteria (SRB) sense a change in their environment and act accordingly to survive. In high moisture environments (depending on nutrients and other factors) bacteria can survive for years, where in low moisture environments, they are known to survive for several months. During this time SRB byproducts create sulfuric acid causing microbially influenced corrosion (MIC) capable of degrading organics including cementitious materials such as thinset.
Category 2 and 3 Water Contamination Under Ceramic Tile Flooring:
The tile flooring system consists of moisture impervious ceramic tile along with porous grout, thinset and the concrete slab. Inspection of the flooring system may identify other substrates, such as a vapor retarder, older flooring, including leveling compounds and fillers. Once Category 2 and 3 water finds a way under moisture-impervious ceramic tiles, contaminants in water become locked beneath. Grout joints and tile edges become the only vapor emission pathways that allows water to evaporate. Soils and microbes brought in by Category 2 and 3 water remain trapped in thinset, open spaces between trowel channels, grout and settled on the concrete slab.
The ANSI/IICRC S500 Standard References:
- Category 2 water can come from washing machines, dishwasher, toilet bowl overflows on the room side of the trap with some urine but no feces, broken aquariums, broken water beds and seepage due to hydrostatic pressure.
- Category 2 contains significant contamination and has the potential to cause discomfort or illness if contacted or consumed (e.g., skin contact, breathing aerosolized contaminated air during drying).
- Category 2 water can deteriorate to Category 3 once microorganisms become wet from the water intrusion, depending on the length of time that they remain wet and the temperature, where they can begin to grow in numbers, thus, changing the category of water.
- Category 3 water includes sewage; wasteline backflows that originate from beyond the toilet trap, regardless of visible content or color; all forms of flooding from seawater; and other contaminated water entering or affecting the indoor environment. Category 3 water can carry trace levels of regulated or hazardous materials (e.g., pesticides, or toxic organic substances).
- Category 3 water is grossly contaminated and can contain pathogenic, toxigenic or other harmful agents, where it can cause significant adverse health reactions to humans when contacted or consumed.
- Category 3 water can contain sewage-borne pathogens (e.g., E. coli, Salmonella, Hepatitis viruses, parasites), plus chemicals and pesticides.
- Aerosolization during aggressive drying can spread pathogens into occupied spaces if not properly contained and it can affect the health of workers.
Creating a Safe Work Environment:
- In a Category 2 or Category 3 water contamination situation, to lessen the amount of contaminants on surfaces and to provide for a safer work environment, restorers should detergent clean and freshwater rinse wastewater that came in contact with materials “before” completing additional work. In other words, the initial goal is to remove surface bacteria, viruses and other forms of contamination that can affect the environment and cleanup workers’ health.
Biological Contaminants Under Ceramic Floor Tiles:
- Most restorers agree, they can clean, disinfect and deodorize hard surfaces, such as the surface of ceramic tile. However, attempting to flush-out Category 2 and Category 3 contaminants from under ceramic tile flooring has not shown to be successful with any degree of scientific certainty.
- Is there evidence that by applying large amounts of a microbial biocide on tile flooring will allow it to absorb into and decontaminate Category 2 and 3 water under floor tiles (e.g., allowing the biocide to flow to the same areas the contaminated water was able to)? This has not been well studied, so, for now, the answer is no.
- Several of our studies “from past years” (e.g., culture sampling the backside of tiles, thinset and concrete slab) were not able to confirm the absence of fecal coliforms.
- In one study that allowed us to create a baseline, we removed tiles from non- affected flooring, where the results of the study confirmed fecal coliforms were not present.
Long-Term Damage from Water and Bacteria Remaining under Tile Flooring:
When water enters under tile flooring, the damage to the flooring system is not always immediate (noticeable), where visible damage may take weeks and months to develop. Even in a Category 1 water loss, the flooring system can be affected by:
- Wood and other organic materials underneath can cause long-term damage such as mold growth, wood rot, pests and rodent infestation and damage to the structure. Over time, occupants may detect musty odors or experience respiratory issues produced by microbial toxins.
- On a concrete slab, long-term damage results from water remaining under ceramic tile flooring that can influence or contribute to microbial growth, resulting in pests and rodent infestation around wet walls and cabinets, and a loss of adhesion because tiles no longer have bonding strength. The thermal reaction of water molecules can result in expansion that increases pressure on floor tiles. Efflorescence occurring from water having contact with soluble salts can contribute to the debonding of thinset can also occur.
In a Category 2 or 3 water loss, the flooring system can be affected by:
- Drying the “surface” of floor tiles may not reduce the amount and types of microbes trapped under floor tiles that remain wet.
- An aggressive drying system should be installed as quickly as possible to remove moisture and reduce microbial growth.
- However, even with the successful removal of trapped water from the flooring system, soils and microbes can remain trapped in thinset, open spaces between trowel channels, grout and settled on the concrete slab.
- One would expect, as long as the substrate remains dry further damage caused by microbial growth would have been eliminated. While this hypothesis is correct, a concrete slab can experience seasonal changes in its moisture content, where moisture vapor transmission(MVT) or vapor diffusion, the vapor pressure differential can increase, allowing certain dormant microorganisms to colonize.
- Meaning, when moisture and organic materials are present, fecal coliform and endo-spore forming bacteria have the ability to transition from an inactive state in dry conditions to an active state in wet conditions.
- Situation Notes:
- After a Category 3 water loss occurred and floor tiles were professionally cleaned and dried, months later, some tiles were found loose (debonded). This resulted in our company being retained to complete further inspection and testing.
- The results of the study confirmed:
- number of tiles were debonded and became cracked from walking across the floor.
- Thinset lost its adhesion to the back of ceramic floor tiles, but it remained solid to the concrete slab.
- Thinset appeared brittle but moisture measurements reported it was dry.
- The concrete slab continued to have elevated moisture content (e.g., above 80% (5.1 on a Tramex CME5).
- Swab sampling for gram negative bacteria confirmed total coliforms and fecal coliform bacteria remained active under the tile floor.
Closing Remarks:
Professional water damage restoration contractors are expected to comply with the ANSI/IICRC
S500 Standard (2021 edition) “Standard for Professional Water Damage Restoration”.
- The S500 Standard References:
- Identify and document the cause and origin of water that was allowed to flow onto ceramic tile flooring.
- If possible, stop additional water from flooding the building.
- Create a moisture map of the visually affected areas vs non-water damaged areas.
- In Category 1 floods, extract surface water followed by creating a floor drying system.
- In Category 2 and 3 floods, extract surface water and then clean and sanitize the surfaces (e.g., tiles and grout) to reduce cross-contamination and worker exposure before installing a floor drying system.
- Once surface water is extracted and dried, use moisture meters and thermal imaging cameras to document whether trapped water is under flooring.
- When trapped water remains under flooring, determine the best system or process to remove water.
- Removing grout or grout sealants can help speed drying although this can be difficult to accomplish without damaging tiles.
- Efflorescence often creates challenges when drying ceramic tile and grout.
- The 2021 S500 Standard Does Not Reference:
- Inspection is required to document the wet flooring system, and when possible, its internal components.
- Proper drying techniques on tile flooring should be able to reduce or eliminate secondary damage in the flooring system.
- Each part of a flooring system that remains wet can cause drying complications, resulting in incomplete drying or damage to the subfloor and tile.
- In a Category 2 water situation, depending on the length of time tile flooring components remain wet, microorganisms can begin to grow in numbers that can change Category 2 water to become Category 3.
- Once Category 3 water is confirmed to have entered under ceramic floor tile, remove grout and loose floor tiles, then moisture monitor and photo document your results.
- When there is a question about the Category of water (e.g., Category 2 or Category 3), before extracting wastewater, bacteria swab affected floor tiles and send samples to an independent microbiology laboratory for analysis.
- Water that affects floor tile substrates, floor tiles should be removed to allow for professional restoration of the substrate.
Looking for a reprint of this article?
From high-res PDFs to custom plaques, order your copy today!


